En esta sección
Journal
Premium*
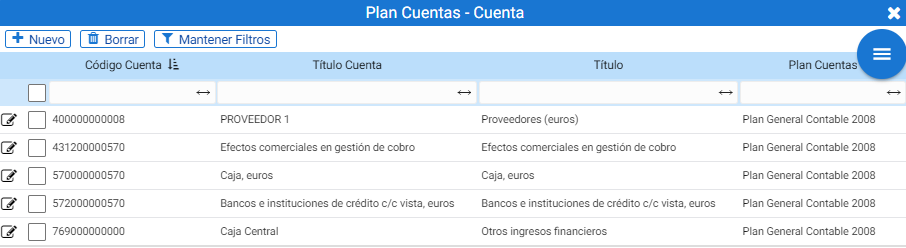
The first tool available in the Accounting menu is the Journal. The first thing you can see upon accessing it is the current day's register by default. If a date range is selected, the entries will be ordered by date and in descending order.
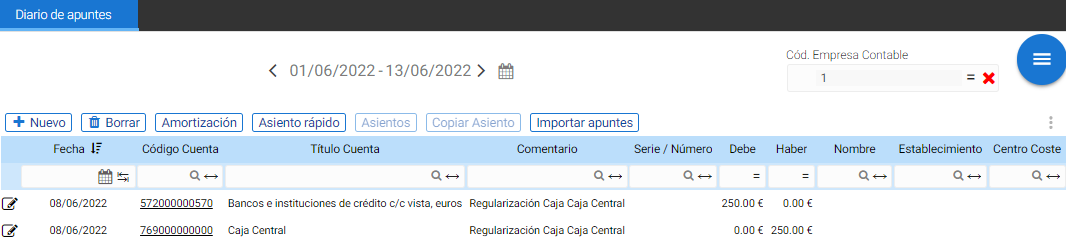
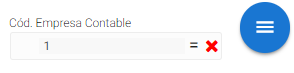
To the right of the date selector is the default accounting company filter.
If the accounting firm filter is cleared by clicking the 'x', all records from all journals linked to the company are displayed, triggering an accounting consolidation.
The seats differ from one another by distinct color:

At the top of the Journal Entries table are the possible actions to create or delete entries. Each of the available options is detailed below.
New Accounting Entry:
The button of New Allows you to manually create a journal entry. This function opens a new screen with the Journal Entry Creation form:
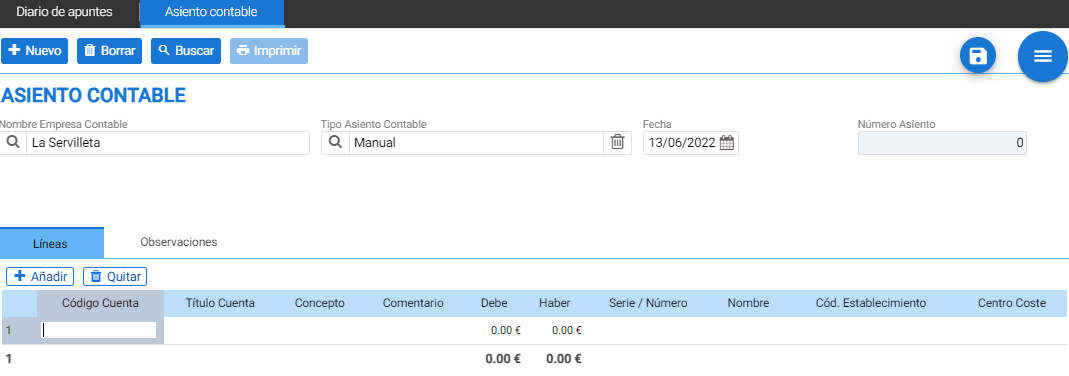
The accounting firm to which the entry will be linked is displayed at the top of this screen. By default, it is the one enabled in the journal, and if none were linked, it would prompt for one.

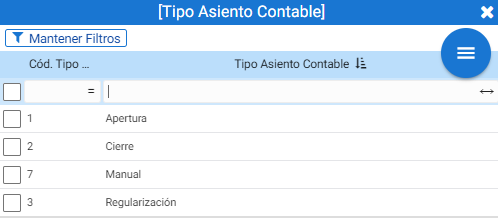
The next selector in the header is the Accounting Entry Type, which is used to indicate whether the entry is a regular (manual) one, an opening, an adjustment, or a closing.
There are also the date and entry number fields.
Below are two tabs to indicate the lines that make up the entry and the observations.
Inside the tab [Lines] There are two possible actions: Add and Remove.
Clicking the Add button allows you to add or create a new accounting sub-account from the Chart of Accounts selector that opens:
The Account Code field allows you to locate the desired sub-account by typing the account root followed by a period and then the suffix.

Once the account of interest has been selected, the following fields in the table must be completed: Concept, Comment, and Debit / Credit.
Furthermore, if it comes from an existing document, it is also possible to assign the Series/Number, Name, Establishment, and Cost Center information.

The program provides the following accounting concepts:
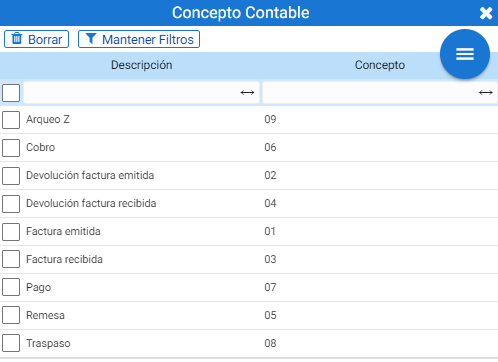
- 01 – Invoice issued
- 02 – Return of Issued Invoice
- 03 – Invoice received
- 04 – Return of Received Invoice
- 05 – Remittance
- 06 – Collection
- 07 – Paid
- 08 – Transfer
- 09 – Stocktake Z
As an example, the insertion of a manual cash collection from a customer is shown:
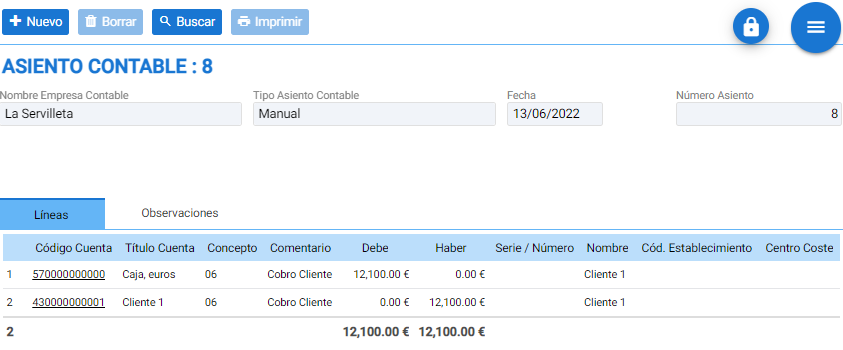
NOTE: Once the debit entry has been entered, when inserting the next entry to balance the transaction, it is not necessary to specify the credit amount; saving the entry calculates it automatically.
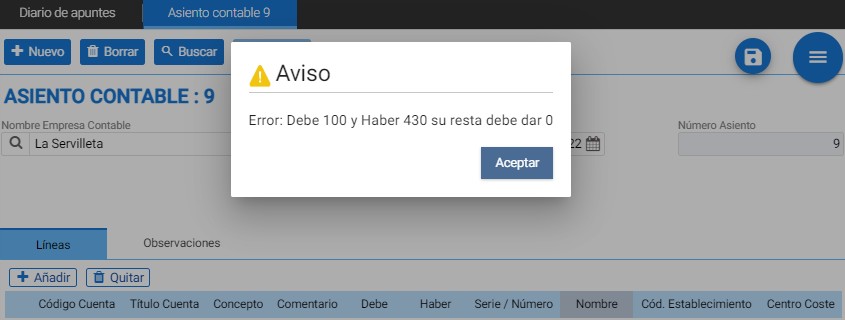
If, when saving the Entry, the program detects an imbalance between both items, it will not allow the operation to be completed until it is resolved.
Delete Seat:
The Delete button will delete the selected entry, both in edit mode and from the Journal of Entries itself, provided that this entry is not linked to the management system, meaning it does not originate from any purchase, sale, or treasury transaction.
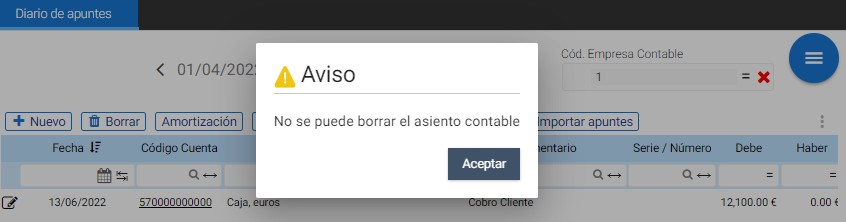
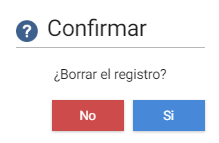
When clicking on the function, a prompt appears to confirm the operation:
Copy Entry:
You can copy manual entries with the Copy Entry function.
Upon clicking the button, a floating window opens where the destination date must be specified.
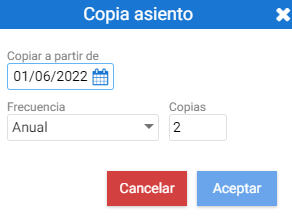
Depending on the options of the "Frequency" combo, that entry can be copied n times over several consecutive days, months, or years.
Quick Seat

On a floating screen, the following fields must be completed: Date, Debit Account (for example, the customer's account that needs to pay), Credit Account (for example, Cash), the Comment to inform about the entry, and the Amount.
When you click Accept, it is saved as a new entry.
Seats
The automatic journal entry generation tool.
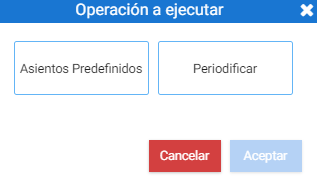
Upon pressing the button Seats A floating screen opens containing two options: Predefined Entries and Periodization.

Predefined Seats: calls from a selector, a predefined seat that has been previously registered from the module of Predefined seats of the menu of Accounting. In this way, it is only necessary to complete some of the entry fields.
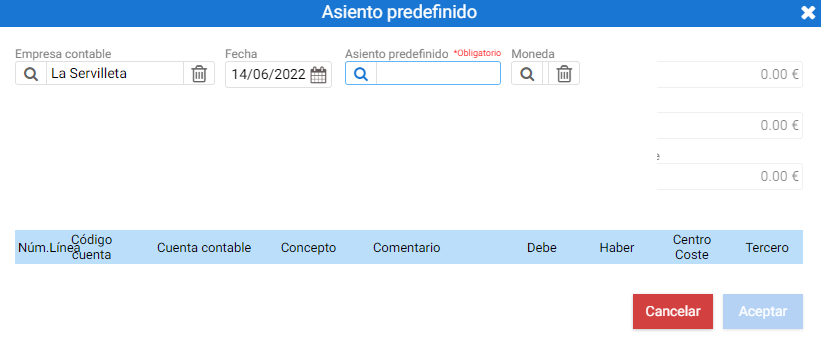
The accounting firm automatically uses the default setting, and for the Date field, it suggests the current day's date.
Once a Predefined Entry is selected in the selector, the structure of the new entry is shown in the table at the bottom, in which the blank fields must be completed with the relevant amounts and accounting suffixes. (we find these on each entity's record, in the Accounting section, i.e: the tab Accounting from the Client settings).
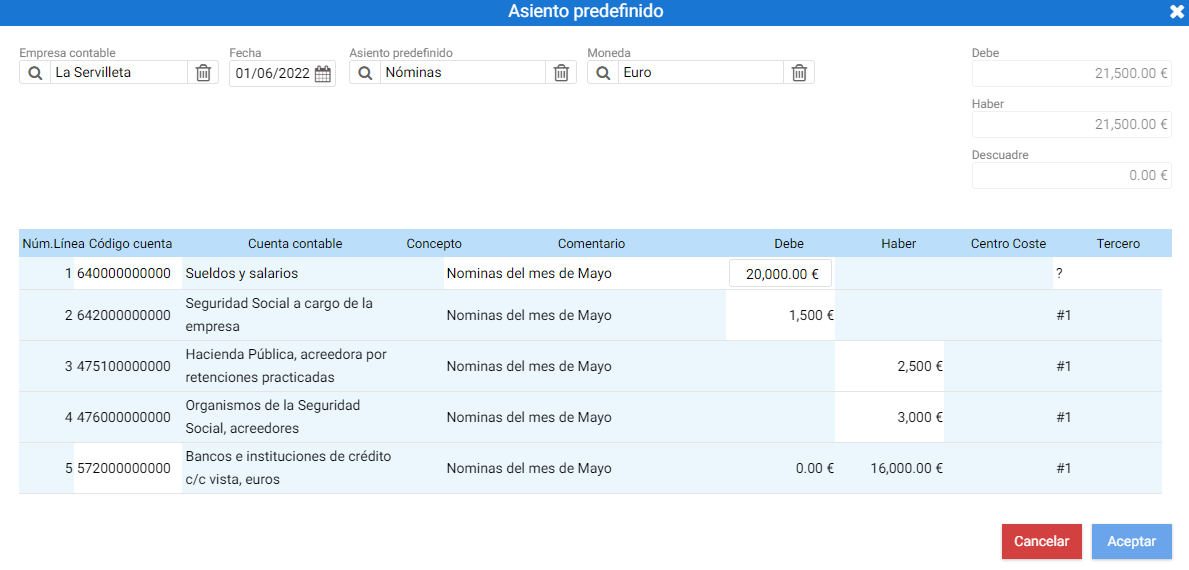
There are five types of Predefined Entries already pre-established by default in HiOffice accounting. Below is an example of the Payroll entry:
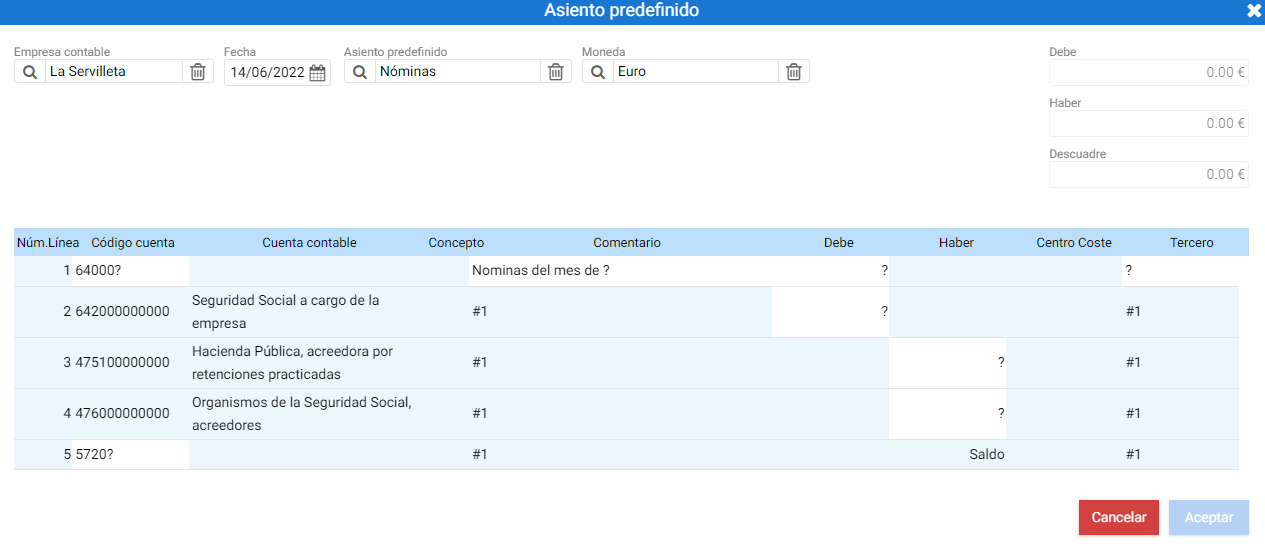
The first field of the table, the Accounting Account Code, can be completed by adding a period (.) followed by the corresponding code.
The comment is populated with the specified information for all the line items of the entry upon pressing the "Enter" key.
Then the amount for the Debit and Credit must be indicated. As this information is completed, the resulting balance will be automatically calculated.
In the Third-party column, with a magnifying glass, it is possible to access the contact search tool to assign them.
Finally with the button of Accept The changes are saved.
To periodize
Just like the function of copying entries a specified number of times within a period, the generation of periodic automatic entries is an action that is performed for a stipulated time and allows to schedule a previously selected manual entry.
Upon clicking on this module, a new floating window opens where the following parameters must be defined:
- Name: the identifier of the periodic seat.
- Accounting firm: the selector for the accounting firm where the records will be generated.
- Date: the start date of the recurring entry.
- Timeframe: can be daily, monthly, or annually.
- Interval: The number of times it should be executed.
Continuing with the previous example, to periodify the Payroll entries for one year, 'Payroll' is added in the Name field, the current month's date is set as the start date, 'Month' is selected in the Time Range, and the interval is twelve months:

The record for the created periodic entry is accessible from the Recurring Entries module, which is located within the Accounting menu.
Amortization
In the Journal, you will find the Amortization tool, which allows for the management of a record of the company's fixed assets and their respective amortization.
Article Amortization:
In order to create the fixed asset records, it is necessary to first have created an item of Type "Fixed Asset", from the Items menu, with the tool of [New]:
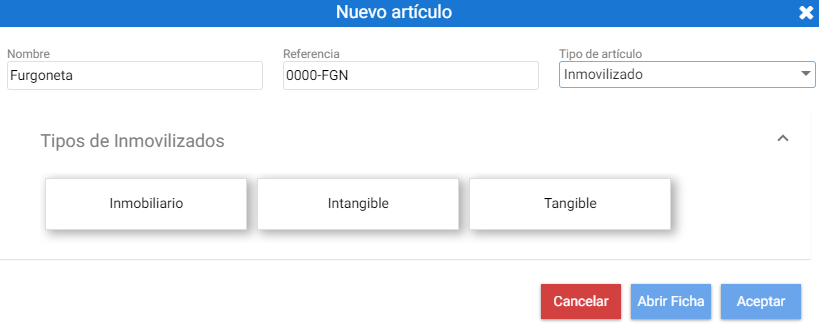
There are three types of Fixed Assets: Real Estate, Intangible, and Tangible. Example: A vehicle is Tangible.
Upon acceptance, a depreciation entry is created, whose maintenance record includes fields for configuring the fixed asset's value and information for its depreciation.
The first thing you can see on the form is a field for the image, the item's name, and its reference.
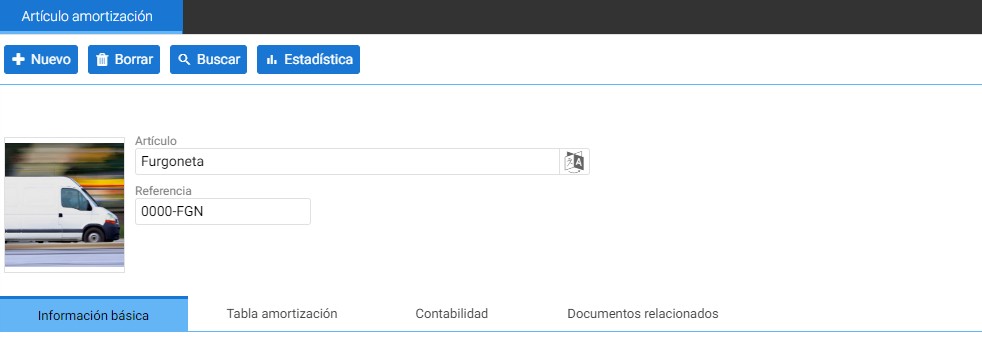
Below the header are four tabs to configure this fixed asset:
Basic Information
In this section, one must indicate the Amortization type, which can be: Linear, By digits decreasing, Manual, By digits increasing, or Progressive decreasing.
The next field to complete is the Date of acquisition of the fixed asset. In case of registering a purchase of the item from the Purchasing Module, the field will be automatically completed with the document date.
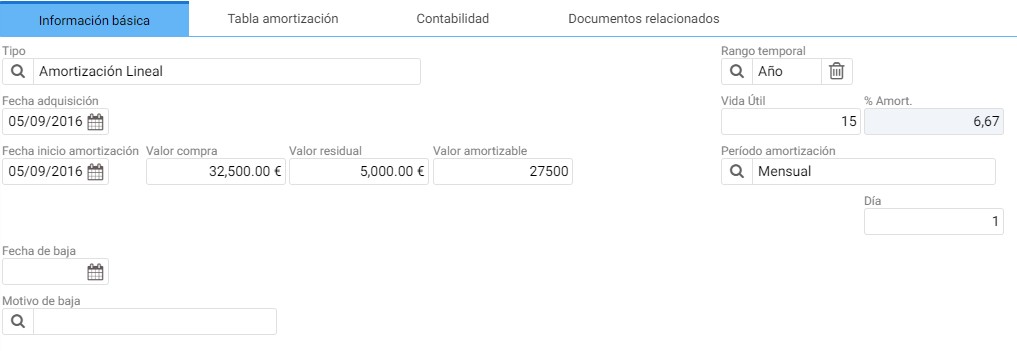
The Amortization Start Date field defines the first day of recording; next to it are the Asset Value at the time of purchase and the Residual Value, which is estimated to remain from the item once it has been decommissioned. By entering these two amounts, the Depreciable Value field will be automatically calculated.
To the right of the section is the time range selector for the calculation of useful life, which can be Daily, Monthly, or Annually, and when the useful life period is defined, the Amortization Percentage (%Amortization) field is recalculated.
The Amortization Period can be: Monthly, Monthly Interval, or Annually. If "Annually" is selected, a Month field and a Day field appear below to indicate the date on which each entry of the amortization schedule must be recorded. If "Monthly" is selected, only the day must be specified.
At the bottom of the tab is the estimated disposal date of the asset and the reason for said disposal.
Accounting

The Accounting tab allows you to configure the root (according to the indicated Account Group) and the suffix that must complete the accounting account to which the entries for this depreciation will be posted, as well as the comment that must be recorded in the notes.
Example of Group dand Accounts:
In the image above, Tangible Fixed Assets have been indicated as the Account Group, whose root is 618.x for the depreciation of fixed assets and 281.x for the accumulated depreciation.

The accounting firm selector allows you to select the accounting system for which the record is intended, in case more than one is available.
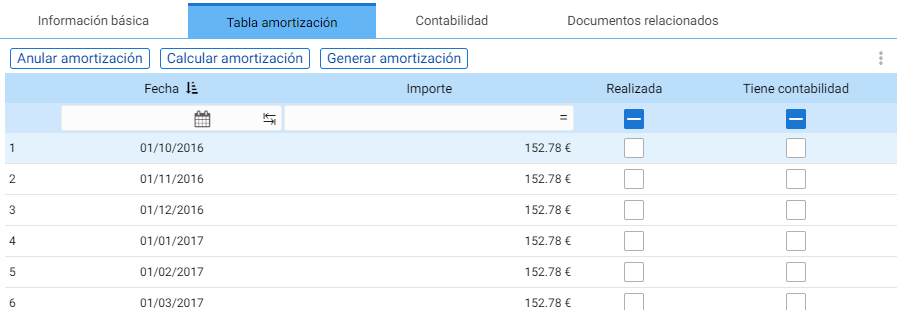
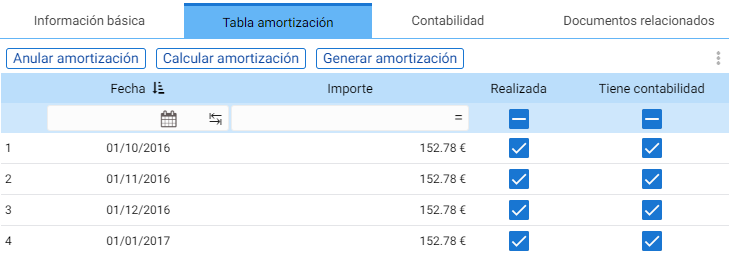
Amortization Table
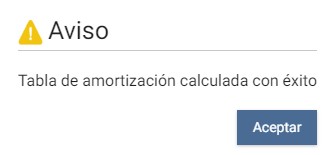
Once the basic and accounting information has been defined, to calculate the amortization table, you must access the Amortization Table tab to calculate it using the [Calculate amortization] button.

Upon confirming the action, a floating notice is displayed indicating that it has been successfully calculated:
This operation completes the amortization table with the amount amortized in each period, taking as many periods as the useful life configured in the Basic Information tab.
NOTE: If a retirement date has been defined in the Basic Information tab, it will not be possible to generate the amortization table, as it will have been stipulated that the item is retired. The useful life calculation must be defined in the Useful Life field according to the indicated time range.
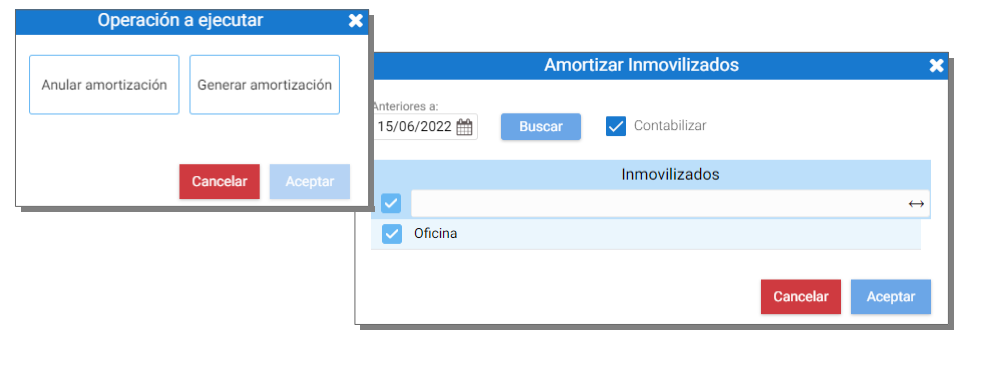
On the board there are two other buttons:
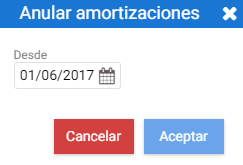
The tool of Generate amortization It will request the date from which to go back to generate the amortization entries that have not been posted yet

Upon accepting the selection, an entry for each period is recorded in the logbook, and the "Has accounting" and "Completed" checkboxes in the table are activated.
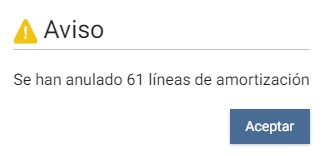
The button of Cancel amortization will void the accounting for records subsequent to the date specified, deactivating the "Has accounting" and "Completed" checkboxes, as well as deleting the existing entries for the period from the selected day until the end of its useful life.

Related documents
If there are documents associated with the item, they can be seen in this list. In the following example image, the purchase of the vehicle has been recorded:

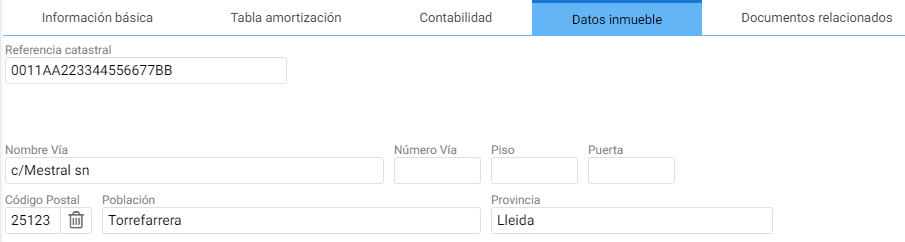
NOTE: If the fixed asset record is of Real Estate type, a tab is displayed to be completed with the Property Details.
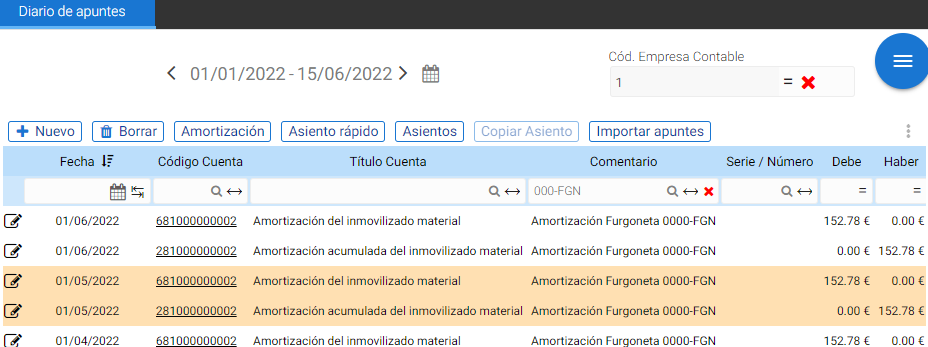
The Notes Journal contains the button for Amortization, which provides the same functions that are on the fixed asset record: Cancel depreciation and Generate depreciation.
When clicking on one of the modules, a floating screen is displayed that allows you to locate records to be processed prior to a date:
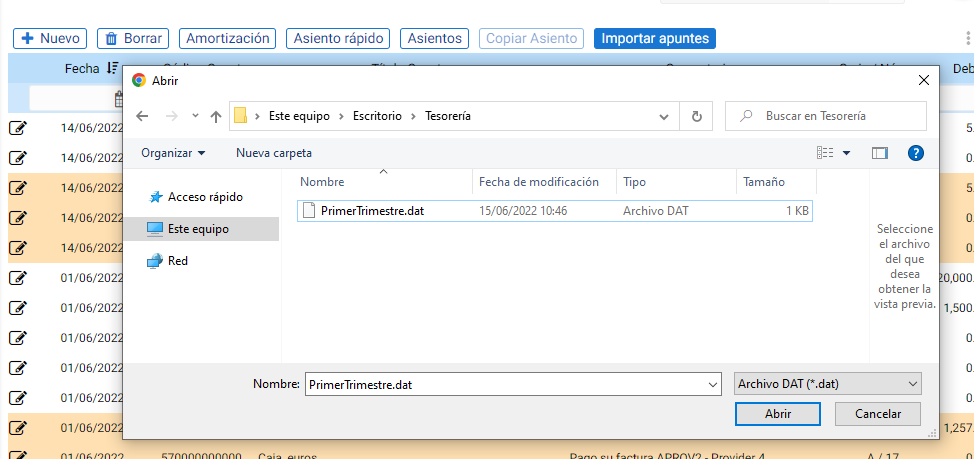
Import notes
This option allows for the bulk insertion of accounting entries by importing a .dat file.
AI Assistant
Section summary
AI can generate inaccurate information; verify the results.